The Saga's of a Makeup Addict.

The Saga's of a Makeup Addict. Welcome to my confessional.

Monday, March 21, 2011

Match Perfection Concealer

Blogger is a sick puppy these days. The doctors said it's Sinusitis - but I don't trust them... Notta bit! No, it's definitely something much much more sinister that has been unleashed upon my bein,g designed to reduce me to a congested, stuffy nosed, hacking, sneezing monster. Steam, Vicks and a box of tissues have been my companions during this hard time...

This is exactly how I felt, red nose and all!

Just call me Rudolph.

Couldn't breathe, couldn't taste, couldn't hear!

The constant use of tissues had scratched the skin around my nose and had left me with broken capillaries. But please, lets add insult to injury - mom said there's a family wedding and I have to attend. No excuses.

Crap.

When I was able to find the energy, I went and stood in front of the mirror and took a good look at myself - sallow and sicky looking skin, puffy eyes, swollen red nose and a general air of pathetic-ness... And I'm supposed to suddenly look presentable?!

Oye ve!

Okay then, if I wanna go from that up there to a relatively close version of ---> ...Well, I can dream, can't I?
So sue me, I'm ill!

Anyway, I had to do what I had to do and look presentable. And what better chance would I get to test run this guy?

Meet Match Perfection Concealer by Rimmel London


I kinda felt bad for putting this guy through its paces in such rough conditions, but hey - I had very little choice here! So I took a deep breath (that was followed by a series of coughs and sputters) and got started on my skin.


The usual moisturizer, primer and liquid foundation. And then I broke out this guy. After a little bit of coaxing, I got the product onto the brush tip and applied it around my nose, under my eyes and onto any spots I had to conceal. The formulation is thick so that worried me at first, but it blended like a dream - no caking here! Now to be honest, I'm not too crazy about the brush tip... The only purpose of it is to apply the product - I still needed to use my finger to blend it out. Another issue I had with this was that it settled into creases a little too fast for my liking... So apply setting powder asap after application. Other than that, it seemed pretty good for its initial use. The thick texture worked in my favor to cover up all the redness the illness had brought onto my face and I set it all with the Match Perfection Compact Powder and a biggest fluffy brush I owned. Then I finished the rest of my face and headed off to the wedding.

I will say this, this product didn't do as well as a highlighter for me - maybe I'll have to get one in a lighter shade but not this guy.

Also, word to the wise - avoid shiny products near the center of your face when you're ill. If your skin is anything like mine (combination) when you're sick, it gets glossy and any product with shimmer in it makes it look like an oil slick.

Back to the evening....

4.5 excruciating hours later, I came home and was dying to crash, clothes and makeup in tow, but that wasn't happening. So I glanced in the mirror and was very impressed to see that it had done its job of concealing well AND it didn't crease or cake on me! Plus, my skin didn't feel heavy or clogged (or maybe my sinuses were just doing such a phenomenal job that I just couldn't tell :p) so that was a job well done! Once I removed my makeup, I saw how crummy I looked, I instantly fell more ill and just wanted to collapse onto the floor right there and sleep - maybe there really is something behind the whole "looking good is half the battle won".

But for now, I must recover. Somehow. Someday. Someone help me!

Have you tried Match Perfection Concealer? No? You must! My shade is Natural Beige. Get yours!

This product was sent to me for review purposes. All opinions stated are purely and honestly my own.

Monday, March 14, 2011

Match Perfection

Just yesterday, I got my hand on this beauty


Rimmel London's Match Perfection Ultra Creamy Compact Powder - yes, that's a lot to say and while I'd love to label it "genius-in-a-compact-case", I'll stick to Compact Powder.

It's Sunday today and I had some errands to run so I thought to myself, well, what better time than now to punish the poor sucker and put this compact powder through the ringer. "The ringer" being a warm Karachi day spent mostly outside with the temperatures in the mid 20's - sunny and a little humid.

So I started out with a clean, moisturized face - I applied a makeup primer and used the sponge applicator provided to pack the product onto my face - my color is Soft Beige. Starting from the center of my face, I worked my way out, just pressing the product on. Once that was done, I took a kabuki brush and buffed all the product I applied into my skin - insider trick: this is the best way to achieve even coverage! I then misted a setting spray over my face and let that dry.


At this point, I took a step back and analyzed the coverage. The color seemed off at first, but the product claims to have SMART-TONE technology, so I chose to give it a chance. I puttered around for 30 minutes and then saw that the powder had indeed adjusted its self! The coverage looked natural and even and just really skin like! It didn't feel heavy or cake-y. At this point, I'm going to mention that I'm a girl who likes sheer to medium coverage. Full coverage looks unnatural to me, unless it's a for photography. So I topped it off with a blush and mascara and set off for my day.

Rimmel London says:

"Up to 14 hours of wear! Find your match with Rimmel London's Match Perfection Ultra Creamy Compact Powder. A Super-blendable and Lightweight formula with SMART-TONE TM technology that cleverly adapts to your skin's natural colour and texture, while blue-sapphire pigments enhance your natural colour and tone. Lasts as long as you do!"

Here's what I found:

My "ringer" included a 30 minute drive to the grocery story, 1 hour spent shopping, a 10 minute drive to an outdoor fruit vendor, 5-6 minutes in the midday sun getting my purchases, another 20 minute drive to a coffee shop, 1 hour spent lunching with friends, a 5 minute drive to another market and then 10 minutes later, I was home. The first thing I did after dumping my bag and keys was to run to my vanity and see my face. Now to be fair, I put the compact powder through quite the test and like any proud cosmetic, it managed to hold its own! Kudos! Of course most makeup gives up at the first sign of perspiration, but this little guy put up a good fight - it didn't dislodge itself! Then again, I didn't swipe at my face either :p

Right now, it's approaching 5pm and its beginning to show signs of weakness. My nose and forehead have developed a slight sheen, but that's also in part because I haven't done a touch up. To credit the formulation, its hit the half-way mark in very tricky weather conditions. Any cooler day and it would still be going strong - any hotter, and even a TV Stick would have called quits. So I'll touch it up and see how it holds for the rest of the day.

(Fast forward a few hours)

It's nearing the end of the day and blissfully the evening was cool. The makeup hasn't given up on me yet, but I don't think I have it in me to last that long without washing my face - also, I've been dying to scratch my nose!!!! It has done a solid 12 hours by now and I'm very happy to give this round to the makeup. I claimed that this was a genius-in-a-box and I say so because this held up, stayed put for the most part and my skin didn't feel clogged or irritated! It also matched my skin tone and made it look even and natural - and that's saying something because sunlight is very unforgiving towards foundations. How do I know it lasted and didn't budge? Well, when I took a remover soaked cotton pad, a lot of product came off my face! Trust me, I checked :p Oh, and the highest commendation I can give this little guy - my DAD didn't even NOTICE I had makeup on my face! HAH! This is from the man who thinks I'm wearing way too much makeup if I wear a red lipstick... I love you pops, but my relationship with makeup is something you will never understand.

Would I recommend this? Oh definitely! It's a must have! Apply some concealer to the trouble areas, buff this on and your skin in prepared! Bring on the war paint! (More on the subject in a future post.)

Have you tried it? Please share your thoughts about this product.

This product was sent to me for review purposes. All views and opinions stated in this article are entirely my own.

Tuesday, March 1, 2011

Get Cheeky!

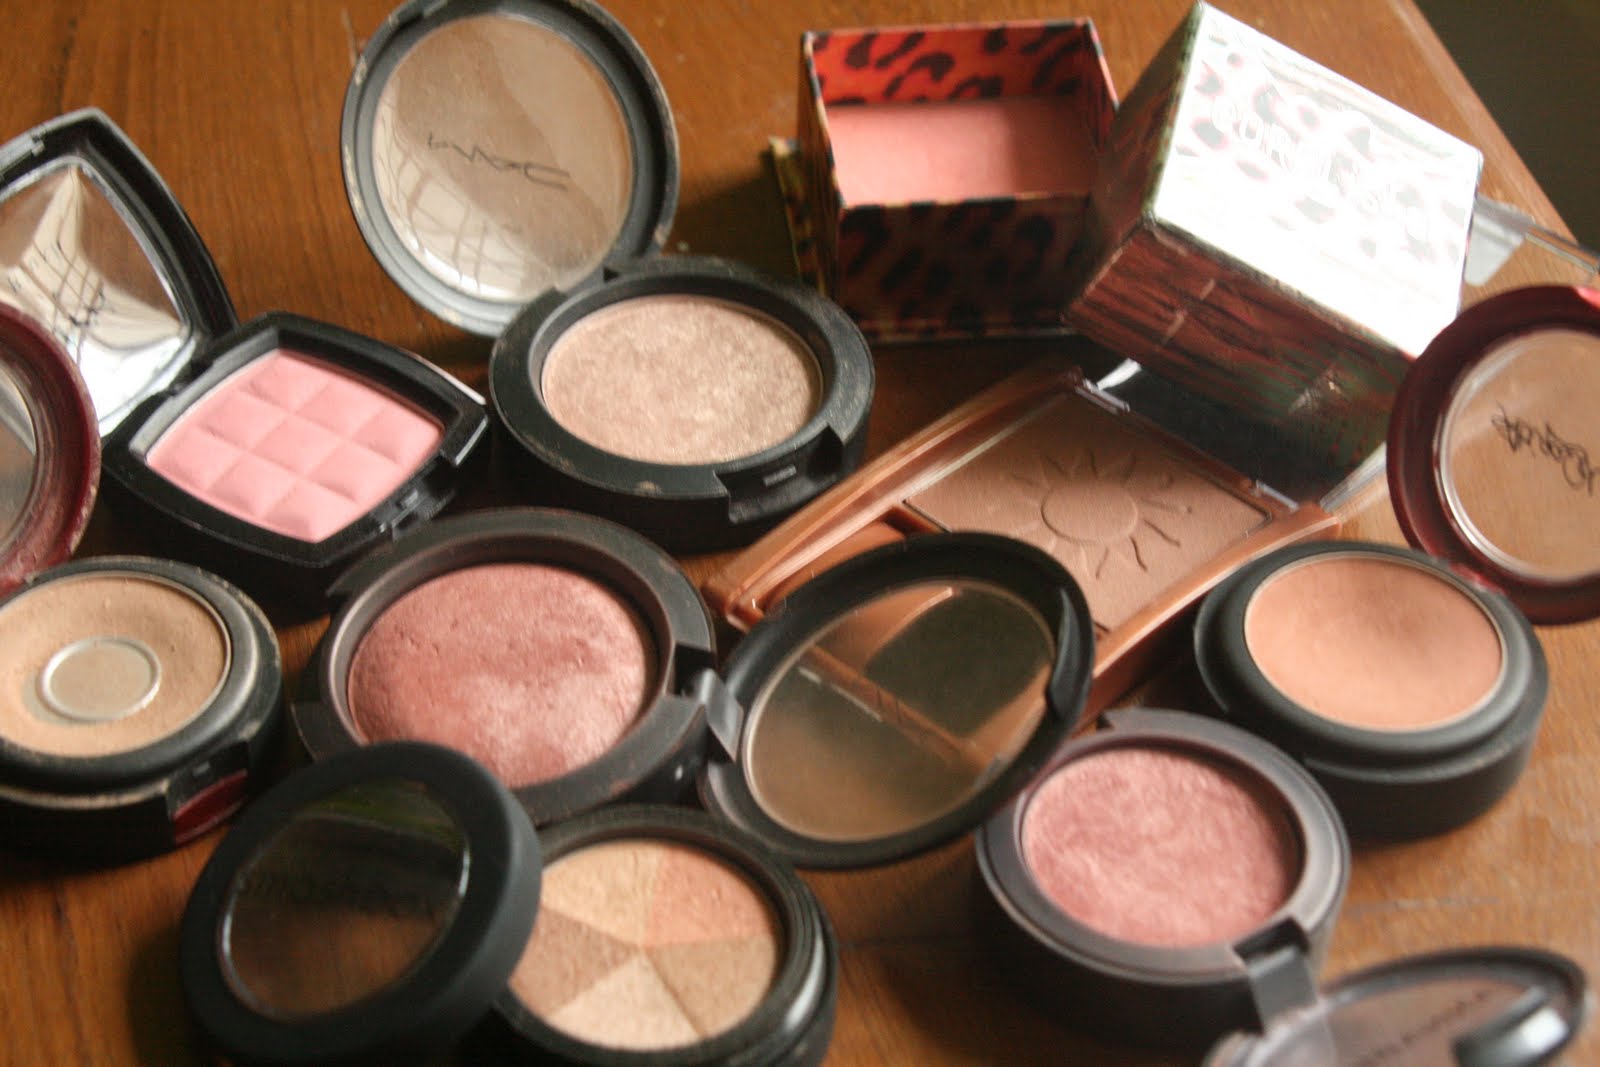
Long gone are the days I used to drool over eye shadows. Now its these beauties that get me all eager and excited!

I'm really loving cheek products these days... Can't get enough! I've been seen walking the thin line between a pretty flush and bruised and battered. Today I decided to pull out some products that I've been loving over the winter and spring. Some are high end and some are locally available.

Lets start with the blushes:

Meet "Superduper Natural" by MAC. It's a Mineralize Skin Finish Blush that was limited edition. It's a dusty rose pink with flecks on gold. Great for a dewey finish! Use the same shade on the eye with mascara and you won't need much else.

Very similar to the MAC blush above, this is from Shoppers Drugmart in Canada by a brand called Annabelle. Its more pigmented and should be reached for with caution. That doesn't stop it from complementing a smokey eye and a neutral lip!

This here is a NYX blush in the color Peach. Now looking at this, it looks more baby pink than peach, but for those with warm/yellow undertoned skin, this shows up as a fresh peachy blush. I wore this mostly during winter as it is a matte shade, but by no means does that mean you can't wear it over the summer.. Knock yourself out!! Put together with a stained lip and some colored liner, you're good to go!


This is Coralista by Benefit. True to its name it's a corally color which smells very pretty too!! It's got some shimmer to it, which makes it sooo much fun to wear when you're feeling blah and don't want to bother with too much makeup. This plus a pink gloss and mascara, and you're set for the day!


Bring on the bronzers!

I've blogged about this puppy before. This is Maybelline Expert Wear Stay-True Bronzer in the color Forever Warm. Its a sunkissed glow with a hint of shimmer. Apply this to the back of your cheekbone and blend it with Coralista for and instant "pretty-to-go" glow!


Now this one here has recently joined the party. Enter Smashbox's Soft Lights Mini Baked Fusion. It may not be able to provide contouring worthy bronzing, but it does an amazing job setting your skin aglow! Apply to the high points on the cheek and blend it with NYX's Peach on the apple of the cheek. It's fabulous!


Meet Falcon. He is a matte bronzer which is available locally in Pakistan by Atiqa Odho Cosmetics. This is the first matte bronzer that I have truly enjoyed using. It does what you need it to do without going gray and chalky on you. Not to mention its good quality and CHEAP!!! Best worn in the hollows of the cheek with Superduper Natural just above.


Highlighters:

Two come to mind in this category.


The first in Honour by MAC. This is a super shimmery shade that must be worn with caution. A little goes a very long way.


This is Dove by Atiqa Odho and is a misunderstood jewel. It is a neutral toned blush with gold shimmer. It can be used for highlighting purposes sure, but I use it as an all over face glow! Evidently I love this product, I've already hit pan here!! With a fluffy brush, dust this all over the face, add lipgloss and go! Like Falcon, it's completely inexpensive!


Honorable mention goes to two recent acquisitions that are fabulous cheek products.


First is Stila's convertible color in Rosebud - blends like a dream and stays put!!!!!

The second is Smashbox's Artificial Light in Flash. This is an illuminizng lotion that goes onto your skin with a Mother of Pearl sheen, making you look dewey. This is what I wear when I don't want to look like I'm trying too hard with blush. I'd apply it to the highs of the cheekbone, above the eyebrow, on the bridge of the nose, the cupids bow and the chin - basically the high points of the face that catch the light..


So go on my friends, get cheeky!

Tuesday, January 4, 2011

The Drop-Shadow Effect

I love Smashbox Cosmetics!!!!!

I can't say it enough! It's a fabulous brand with amazing products and with a very creative team of makeup artists. They have a channel on youtube where they show all the amazing things they can do with their products and showcase their new stuff too!

Let me share a secret with you: To unwind after a long day, I go online and watch makeup tutorials. Now SHHHHHH!!! Don't tell anyone I told you! They help me relax! So after one very exhaustive day, I was watching Smashbox's channel when I came across something they called the "Drop-Shadow Effect". As I was watching this video, I thought to myself, holy smokes, this is brilliant! It takes eye makeup to a whole new level of fun!

The concept is simple: why not bring the focus to your lower lash?

I had to try it! I found my guinea pig in my cousin who very graciously volunteered (THANK YOU Z!!!!!!!)


And it looks great too! What I've done here is, a neutral shadow to the lid, a brown in the crease and outer V, a black pencil liner, very fine and very smudged, right on the upper lashline to make it appear fuller and as much mascara as one can stand. And Z has such GORGEOUS lashes!!!

On the lower lashline, I applied a white eye pencil to the waterline and used my Urban Decay 24/7 eye liner pencil in Ransom, just along the lashes, all the way out to the outer V I made. Then I took my Twilight Palette and picked the purple color called Alice and use my pencil brush to set the pencil, make it more vivid and blend out the edges. And then more mascara, if you please!

It's so simple! In concept and in practicality too! When ever I'm feeling whimsical, I knock out a drop shadow look that has people doing second takes. Try the above using greens or blues.

Or check out Smashbox's version of them!


Black and Neutral...


... Or Eggpland and Taupe...


... Or Charcoal and Silver...


... Or even Blue and Gold!


Try 'em all out! Nothing spruces up a look like a splash of color.

Happy Drop-Shadowing!


P.S. Z rocks the Drop Shadow!!!

Friday, December 31, 2010

Makeup - To - Go!

“There is a great moment, when you see, however distant – the goal of your wandering. The thing which has been living in your imagination suddenly becomes a part of the tangible world.”
~ Freya Stark

I love to travel - I don't really care for the traveling part that involves airports and luggage carousels and immigration, or even the flying part! but I love to arrive someone unfamiliar. When I get there, I take in all that I can smell, see, hear, feel and taste on the air - and then I grin like a little girl at all things new.

I recently had an opportunity to travel to northern Pakistan and live in the foothills of Murree. The trip was for three days and in the middle of an approaching winter, so I had to pack smart, which meant separating myself from all my makeup!


After a lot of consideration and rationalization and logic, I managed to put together my travel bag, and packed it away before I packed more things into it!


There it is, my teeny tiny travel bag, stocked for 3 days in the mountains. Amidst the wooly warm things, I had my makeup stuff.

Here's the skinny:
* Boots tea tree Shine Control Day Moisturizer.
* Stila Pretty in Paris makeup kit (read the full review here).
* Rimmel Renew & Lift concealer in 201
* Urban Decay Skyscraper Mascara
* Luscious Lip Couture in Celebrity
* Revlon Luxurious Color Eye Liner
* Sephora # 13 Rounded Crease brush
* Body Shop Merry Cranberry lip balm


All things considered, I thought I did pretty well in the "packing light" department. Here are a few quick tips that will make all of the above multitaskers!

- Mix a dot of moisturizer and a dot of concealer to make your own eyelid primer.
- The Stila convertible color doubles as lip stick AND cheek color.
- The Revlon pencil blends like a dream and has a smudger at its end.
- The #13 brush is one of my favorite tools to apply, blend, wash, crease, ANYTHING! Its my go to brush.
- Your moisturizer will help to remove any remaining vestiges of makeup at the end of the day.
- Lip balms are an essential part of any travel - be it in the air, on the ride over, after your wake up, before you sleep, after your meals.. You get my point!
- Once you have applied your mascara, use whats left on the wand to set your brows.
- Mix an even bigger amount of concealer with the moisturizer and make your own tinted moisturizer.

And you know what? I didn't miss a thing from my entire stash! This was plenty!! But I did have to stick in one last thing that I couldn't live with out...

The stowaway was the Body Shop Body Butter in Coconut. This one is particularly an acquired taste as I've met very few who appreciate it. For me, it smells like the beach and brings me into a summer state of mind. Also, it makes my skin feel dream soft!

I hope this article helps the packrats like me lighten up some.
Happy travels!

“We live in a wonderful world that is full of beauty, charm and adventure. There is no end to the adventures we can have if only we seek them with our eyes open.”
~ Jawaharlal Nehru


Saturday, November 6, 2010

Makeup DO's and PLEASE DON'T's!

If you were to follow one and only ONE rule of makeup, it must be this:

Makeup is to be applied in plenty on light, in front of a mirror.

That's it.

Sure, you can get technical and install a swivel headed lamp above your mirror that's positioned at a 45 degree angle from where you sit/stand in front of your mirror so as to give you the best view needed to bring your features to life, but really, all you need its light and a reflective surface...

... a memo that was missed by a few good folks of the Glitterati.


O H


M Y


GOODNESS!!!


Oh lordy!

These are images that I chanced upon and well... they kinda do speak for themselves, don't they?


Permit me to provide some simple solutions.


This is Emma Watson of the Harry Potter films fame. She has lipstick on her teeth!!!!! This should be a punishable act!

Solution:

A simple way to avoid it is by first applying a matte lipstick with a lip brush, blot it and then your gloss over it (the matte lipstick prevents the lipgloss from bleeding and feathering) but to ensure that your lip ware doesn't stray onto your teeth, take your index finger, and put it into your mouth, up to the second digit/knuckle and wrap your lips around it, making and "o" and pull your finger out. Any excess lipstick/gloss will rub off onto your finger, leaving your pearly whites, exactly that!


So who ordered the extra-clumpy?

Tammy Fay has always loved her some voluminous lashes but C'MON!!!!

Solution:

Take your wand as close to the lash line as you can get with out smearing the eye makeup. Shake the wand back and forth in quick motions to deposit most of the product at the base and then rolling the wand, sweep it upwards towards the tips. Repeat this on the inner and outer corners for clump free, voluptuous lashes. Don't forget to roll the wand for even product distribution!


Everyone knows how much I love bronzers, but there is a point where the glowing stops and the reflectivity begins! Holy light blubs, Batman!

Solution:

A bronzer should be two shades darker than you skin tone with SOME reflects. Follow the "rule of 3" when applying. Take a big powder/blush brush and start your application on top of the eyebrow arch, towards the temples, down to the hollow of your cheek and back and finally, down to your jaw bone, towards your chin - essentially creating a "3". To further blend, take a kabuki brush and buff it out. To add additional sun-kissed-ness, LIGHTLY run some bronzer across your forehead, nose and chin, only using the left over product on the brush. Finish this with a matte peach/pink blush and glow away!


Miss "That's Hot" has always had a golden glow about her, but CAKED ORANGE is a new one. Lets find her a new BFF (better freakin' foundation!)

Solution:

When sampling foundations, there are a few rules to follow:
1. Color: Test the product on your jaw line or inner fore arm and blend to see if it matches the skin color. If it does, its the right color.
2. Texture: Creams for dry skin; liquid for combination; and powder for oily.
3. Application apparatus: Liquid foundation brushes for (duh!) liquid, sponges for creams and kabuki for powders.
4. Application: APPLY AS NEEDED! Moisturize your skin first and then apply your foundation to the center of your face and blend outwards. Apply concealer to problem areas and set with translucent finishing powder. THE END!

THIS HAS NOT BEEN PHOTOSHOPPED!!! Nicole here quite literally over powdered her nose!

Solution:

I'm going to hazard a guess that this was done in an attempt to covered any redness or dark circles. The easier way is to apply a concealer, a shade or two lighter than your skin tone, under the eyes and around the nose area. Cover this with foundation and set it with a finishing power, or Mineral Veil. No re-powdering needed.


Dear X-Tina,
The 'porcelain doll' look belonged to our era.
Sincerely,
The 1920's.

Solution:

Under eye concealer should be only two shades lighter, that your natural skin color so that when you do put foundation over it, it comes back down to your natural tone, as opposed to gray. Also, highlighter should be applied to the highs of the cheek bones, above and below the eyebrow arch, bridge of the nose, cupids bow and the tip of the chin to catch the light. ONLY!

Photographer: "We need some Kleenex here, STAT!! A face is flashing back!"

Solution:

Mattifying primer! I've said it before, the primer is a genius invention, ye of little faith! It would not only make the makeup last, but it would also absorb the skin's excess oils that come creeping to the surface.

It also doesn't hurt to keep some Kleenex handy on a humid night out. But remember to dab, not scrub or wipe!


There's blushing, and then there's bruised. Overkill X-Tina, serious overkill.

Solution:

Blush is seasonal - Summer is for bronzers and shimmer blushes. Winter is for a matte flush. When applying blush, decide what you want to accentuate: apples or cheek bones.
Apples: select a color that gives you a wind bitten flush such as a pink/peach color. Smile to find your apples and using a big brush, apply the blush in a circular motions, blending the excess towards the cheekbones. This gives a youthful glow.
Cheekbones: pick a warmer blush color and starting at the temples, coming down and making somewhat of a Nike Swoosh through the hollows of your cheeks and blend! This will also provide an element of contouring too!

There is something to be said about a smokey eye - and something completely different when presented with panda eyes! Not only do they look scary, they render the face devoid of any color and make they eyes look smaller!!

Solution:

Don't bring the shadow so low under the lower lash line. Using a smudgy kohl pencil, line the waterline, spilling out just a touch onto the lash line. Switch to a pencil brush with some matte black shadow and smudge along the lash line. Not only does this provide the under eye smoke, it also sets the kohl in place. I've too often seen kajal that has run from the waterline, past the last line and accentuating the dark circles. Your body heat causes the oils in the kajal to melt and run. The shadow will absorb the oils and make it last longer.


This post has not been about knocking the celebs, for sightings such as these are very rare and their makeup artists are usually perfect. Countless of us make these mistakes too and don't realize until someone, very embarrassingly points it out - trust me, I've been there!. Be warned, be safe and be gorgeous!

Cheers!

Tuesday, November 2, 2010

All Hallow's Eve.

So it was Halloween this past weekend, and all of Karachi was a buzz about what they are wearing to Club Night. Benny called me up a month before and said, "so how are you with costume or period makeup?". My response: hell if I know! I've never tried either! She wants to be either an avatar (oh my, that's gonna be a lotta blue and white everywhere!) or a geisha (she's gonna have some serious dancing troubles). I told her it would take some research, some trial and error, but we could get there eventually.

Flash forward three weeks


"Tanyaaaaaa! The avatar costume material isn't available! I'm gonna have to purchase a whole stock of tacky cheap blue material and it's just not worth it!"

My reaction: *phew*

Flash forward a few more days


We're slumped in Ben's room, I'm exhausted after a long day at work and Ben's curled up into a ball because her tummy muscles are killing her. The tv is on and we're flipping channels and all I registered what a flash of a blue wig when Benny exclaims "I wanna be Katy Perry for halloween!!!" What the?! She whips out her phone, calls up her designer friend and asks her for an estimate for the cost of making a dress out of confections and if it was even plausible. Ofcourse it is! But it'll cost Rs. 8000 to make (that's about $90).


Flash forward another couple of days

"Damn, I really wanted to be Katy Perry, but it's just not worth spending that kinda money for just a few hours. I need another look." I suggest, why not do like a zombie doll/corpse bride/bride of Chucky type thing? Her response "yeah, but I wanted to be Katy Perry!"

Wednesday night

*Ring*

It's Benny. "You won't believe the last two days I've had! (gossip gossip gossip)... And I've been thinking more about that dead zombie doll idea..." Ka-CHING! I knew I'd sway her eventually! "I have a white skirt, but I'm going to need like a lacy white top and some ankle booties." And while she rambled on about costume ideas, I mentally rubbed my hands together in delight of the upcoming play day ahead of me! Oooohh, what fun!!!


SATURDAY ARRIVES!


Benny shows up to be house with a backache and a heart set on venting about the trials and tribulations of living in Karachi. We sit down to chat, while she eats lunch and I inwardly curse my diet. She still hadn't found the white top and person X had really hurt her feelings. We (and by that I mean SHE) finish up lunch and head into my room where I dive head first into my closet and come out with two tops that looked like they could belong to a doll. Tried both, loved both and decided to see which one suited the look better. Then we got caught up on Gossip Girl. Evening rolled around, and I started to collected my makeup. The look of judgment, mixed with horror, mixed with amusement, mixed with derision on her face, when she saw how many places my makeup emerged from, nearly made me feel guilty at its volume.... nearly. But then I retorted with a clever "don't jealous" and felt instantly better. Two armfuls and a car ride later, we got to her place, where she made me a sandwich and I set up my transformation station in her flatmates room.


And so it began on all hallows eve...


I started by covering her from forehead to back to decolletage with Kryolan TV Paint Stick in Ivory and set it with the lightest foundation powder I owned. (In retrospect, I should have started by covering the eyebrows - a mistake, I will never make again) I covered the eyebrows by using lash adhesive to glue them down and then covered them with my foundation. Next came the eyes. I measured a quarter inch under the lower lashline and starting from the tear duct, I drew and outline all the way till the outer eye. I filled it in with a matte white cream shadow and set it with a matte white powder. Then, using a black gel liner, I liberally lined the upper lash line and followed it around the new lower lash area I made, thus making the eye appear much bigger, rounder and more doll like. Using a gray shadow, I drew in a new crease line which ended near the natural brow and drew in a new brow, half an inch above the natural one. Using a shimmery gray shadow, I began shading from the crease line upwards and added a shimmering white highlighter underneath the new brow. Oh and I used a neutral shimmery color on the lids too. I should mention that before we started this "reconstruction", so to speak, Bens had put a bucket load of hair product in her which we then proceeded to set with rollers and benders to give it that curly, abused look. An hour before opening them out, we blasted the hair with heat from a hair dryer too. Once the eyes were complete, I added a set of the craziest lashes I could find on the upper lash line and a set of relatively natural looking ones below and using a gel liner, we filled in the empty areas with hand drawn lashes. I contoured the face with a matte charcoal gray shadow to give her a hollowed, unhealthy look and then drew in the lips. After concealing them, I took a black eye pencil and drew in heart shaped lips. Mixing an indigo and bright fuchsia eyeshadow onto my ring finger, I dabbed the color onto her lips, giving her a purple toned lip and coated it with a purple lip gloss. Finally, we opened out the hair, back combed it some and tied two red ribbons into the messily partitioned hair.

The final look...

Voila!


Just the picture of innocence, ain't she?

Oh, and the dress was finally a white cotton spaghetti strap top with a frilly white skirt under, which, eventually looked like a dolls frock. This was paired with black stockings and gray ankle booties that had black lace all over. I was one proud mama indeed!


Oh!!!! And in between creating a dead doll, I made me an Egyptian goddess too! Blue on the lid, gold as high lighter, gold under the eye, tons on black gel liner, false lashes, mascara and oodles of bronzer everywhere made Ms. MB a glowing, gorgeous (which she already is) goddess!

Next year, I'm taking a leaf outta Cougar Town season two and dressing up as a weather person that got blown away!

... Or something like that..

Cheers!